 Darren, Sophie and Greg working on the V-Studio.
 Greg laying down some electric guitar tracks
 Darren, Sophie and Greg working on the V-Studio.Greg laying down some electric guitar tracks
 I've had my eye on this unit at Long and McQuade for a few weeks now. This particular unit was used but under a very close inspection, it looks like it was used very little. It shows absolutely no signs of wear at all. It actually looks like it was only removed from the box. I found one previous session on the hard drive so I know that it is not new.
 There was mention of a computer application that will calculate the ideal speaker locations for any given room. You simply input the room data, such as dimensions and furniture etc and let the program calculate the optimum speaker placement. However, due to the complexity and countless permutations it can take a week or two to generate the information. Yes, a week or two (you read that right). A specific application was not mentioned as we were talking about the application functionality in general. I did some hunting on the web and found this one. TOA Speaker System Design Software. I am downloading it for free from their website as I write this blog. I'll be checking it out and I'll post my review in a separate blog entry. http://www.toaelectronics.com/speaker_software.asp UPDATE: I only had a chance to briefly check out this software package and I'm not sure that it will do what I described earlier. I will dig into this a little further at a different time.
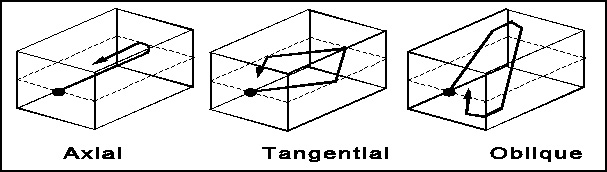 In this example we will say that this cube room is 10' x 10' x 10' to make the math simple. Using the formula frequency=velocity divided by wavelength we can calculate the frequencies. We know that the wavelength is 10 feet and the velocity is 1100 so we can then tell that the frequency equals 110 hz. This figure increases by 110 hz so then you would have 110, 220, 330, 440, 550, 660 etc. However, in this example we can cut the 110 hz in half to 55 hz. 55 hz is equal to the A string on a bass guitar. So in that example room the A string would sound louder because the room will resonate the frequencies more and they pile up to make it louder. Now that the problem frequencies can be identified, we can move on to treating the room. More on treating rooms in a future blog.
 I have always wanted a chance to build a guitar to see if it helps you really connect with it. I found a company called Grisly Industrial and they make these guitar building kits. Basically you assemble it yourself and do your own finish. They no longer sell this particular kit, but they do make several others.

 I recently purchased one of these APEX 210 Ribbon Mics. The first thing I noticed was that the cord was permanently attached to the microphone. I'm thinking that since cables are prone to fail, it may prove to be a PITA. On the other hand, hard wired like this will make for a cleaner, more direct connection to your pre-amp. After first plugging it in I thought I received a dud. It was then that I realised that this mic requires a lot of gain.... huge amounts of gain. Once I pumped in a lot of gain I started to experience awesome results. I was only able to test this mic for a short time but my first impressions is that this mic would be well suited for female vocals and acoustic guitar. Especially when used in acoustically treated room.
 Our session this week opened up with a discussion about file compression. This conversation was sparked by a recently created audio file compression discovered in Reaper called OGG. OGG files appear to be a very efficient means of file compression. Note: we were wondering about the OGG files being possibly the only option that Reaper would use, however I have looked into this and in fact Reaper supports many file formats. From the Reaper Help File
REAPER allows you to use different recording formats for different tracks in the same file. The default format for each new track that you create will be determined by your Project Settings. To change these or any track, simply right click over the track’s VU meter, then from the menu choose rack Recording Settings. You can choose any of the formats WAV, AIFF, Monkey’s Audio, FLAC,MP3, OGG Vorbis, or WavPack lossledd compressor. Depending on which format you choose, you will be presented with a range of options appropriate to that format.
 per second. For ease of calculation we are rounding down to 1100 feet per second. References of thunder clap we discussed as a way of determining distance. Temperature also enters this equation. For every drop of 1 degree, sound will slow down by 1 foot per second. Here are some notes about effects. Reverb can be referred to as the overall ambient characteristic of the sound. Decay time refers to how long the note/sound sustains. Typical examples are a 2.5 second decay at a rock concert, .4 second decay in our classes live room, and 6 seconds in a cathedral. Diffusion refers to how smooth the reverb is. Early reflections are discernable echo/series of repeats. Repeats must be more than 35 milleseconds before a destict repeat can be detected. Chorus modulation is at a fixed rate and decay.
 Now for the fun stuff. We began recording one of the instructors original tunes. In this session we first recorded a scratch track. This was done by recording a rough version of the song using one microphone and was set to a click track at 99 bpm. In this case we used an AKG 414 set to a circle pattern. The placement of the mic allowed for both the vocals and guitar to be well balanced. The location was approximately half way between the sound hole of the guitar and the mouth of the performer and about 12" in front. We then began replacing the scratch guitar parts with overdubs. One guitar overdub was panned hard left while a additional guitar overdub was panned hard right. Once we were happy with the guitar parts, we moved on to recording the vocals. We only had enough time to lay down one vocal track but the quality and performance were good enough to print and move forward. We saved the project and will be adding more instruments in the next lesson.
  Every year around this time, Long and McQuade have a sale to blow out their previous years inventory. This year was no exception and there were some great deals to be had. I walked in looking to purchase the APEX DP4 - 7 piece drum mic kit. Two other mics caught my eye and were priced too good to pass up. I ended up with an APEX 410 Wide Diaphram Condensor and a APEX 210 Ribbon Mic.
 There was no class tonight as our instructor is working the Envision Jazz Festival. For those interested, this Jazz fest has been going on for 26 years now. Performances are tonight (Thursday) and Friday night. You can read all about it here;
 I'm not sure that I will be able to attend the Jazz festival this year but I will be going to see a buddies band on Saturday. Big John Bates and the Voodoo Dollz are playing. Cheers JT Massacre! Looking forward to seeing you. For more information on his show, check out their website at http://www.bigjohnbates.com/
  With many thanks to my wife Maria I was able to get my control room into some sort of orderly fashion. This is where I do all of my mixing as well as listening to my old LP's on occasion.
 In our class the other night, we were once again using the Roland 2480CD DAW. I'm really beginning to appreciate this piece of gear so I thought I would post a quick blog about it.
 This weeks session began with a discussion on WAV files. We took a look at a variable waveform in ProTools. Zooming in on the wav
  file we were able to see the peaks and valleys. It was pointed out to us that the waveform includes both amplitude and frequency information. The image to the right displays a typical waveform as viewed in many audio software applications. The image to the left displays a zoomed in image of the waveform. The jagged edge displays the frequency while the overall shape of the wave represents the amplitude.

